Quick Start
warning
The Hear Back PRO is capable of driving most headphones to extreme levels that can damage your HEARING!
ALWAYS turn down the Mixer "Master" volume before putting on in-ear headsets or headphones.
Connecting the System
- Connect the appropriate input(s), as shown in the example hook-up diagrams.
- Select the desired input using the front panel switch.
- Connect Hear Back PRO Mixers to the Network Card outputs using CAT6 cables.
- Turn on Hub Power.
- Set all Mixer channel and master volume levels to 0%.
- Connect the headphones, in-ear monitors, and/or line outputs for connecting to wireless in-ear systems, powered monitors, or other devices requiring line-level inputs.
Hub Adjustment
- Adjust the level at the input source (DAW, mixer, etc) until the RED clip LED's on the Hub just come on.
- Reduce the levels on the input source until you have a GREEN LED.
- Adjust the source for as much signal into the Hub as possible without clipping. Higher input levels improve signal-to-noise and dynamic range. If using an Analog Input Card and you are unable to adjust your source without overdriving the Hear Back PRO system, follow the "-10dB Pad" instructions below to achieve and extra 10dB of headroom. Remember, higher input levels improve signal-to-noise and dynamic range.
-10dB PAD
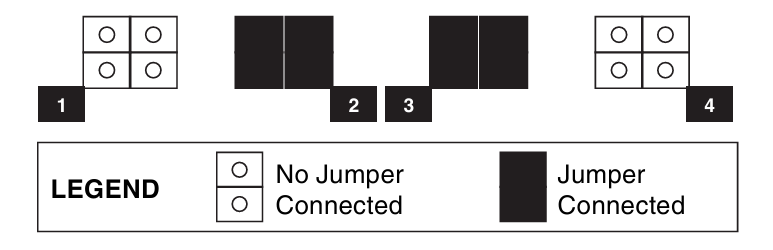
The Analog input card provides 2 jumpers per channel (16 total) that can be removed to achieve a -10dB pad per channel. These jumpers are labeled 1-8 (corresponding to each input channel), and located one inch away from the DB25 connector. So, in this example, input channels 1 & 4 will be reduced by 10dB, while input channels 2 & 3 are not reduced:
Mixer Adjustment
- After you have the signals optimized on the Hub, turn the "Master" volume up to about 10 o'clock.
- Raise each channel's volume up to a comfortable level.
- Avoid adjusting the master volume too high and running the inputs too low.
- To stereo-link any channels, enter the stereo-link control interface as described in Stereo Link Control, and toggle them on.
- To pan any mono channels within the stereo field, press the PAN button to make adjustments.
note
With FW V2, each Mixer can have stereo links independent of other Mixers.
With V5 and above, stereo links are stored in the Hub – linking is global.
AUX IN Adjustment
- If using an auxiliary input, connect it to the Mixer via the appropriate "LINE" or "MIC" input.
- Select the appropriate input via the "AUX IN" selector switch.
- If possible, adjust the input source for maximum volume without clipping.
- Press the "AUX" button to turn the "Master" knob LEDs "RED" and slowly turn the "Master" knob to a comfortable level.
- Press the "AUX" button again to exit auxiliary volume control.
Now enjoy personal monitoring at its best and have fun!